


This easy and inexpensive raised planter stand is a great solution for a variety of garden issues.
It’s a great option for keeping your garden organized, and if you don’t want to plant directly on the ground so as to keep critters away from your produce. It’s easier on your back when watering or tending your plants. This design also allows you to attach trellising.
It’s a great option for keeping your garden organized, and if you don’t want to plant directly on the ground so as to keep critters away from your produce. It’s easier on your back when watering or tending your plants. This design also allows you to attach trellising.

Building one won’t break the bank as the stand can be made of repurposed timber from your previous woodworking projects. The planter is made from repurposed drums which are inexpensive and can be found locally.
What would you be planting on your own raised planter stand?
If you have other ideas on how this can be improved, let us know in the comments section.
What would you be planting on your own raised planter stand?
If you have other ideas on how this can be improved, let us know in the comments section.
Materials:
(3) 55 gallon juice drum
2×4 pressure treated lumber
Tools:
(3) 55 gallon juice drum
2×4 pressure treated lumber
Tools:
- Hand Saw
- Measuring Tape
- Clamps
- Straight Edge (square)
- Wood Glue
- Hammer
- Chisel
- Screws
- Power Drill/Driver
Instructions:
Build The Assemblies
You’ll need four assemblies for three drums. Begin by building the four support assemblies that will connect the 2×4 stringers. For simplicity, make them identical and symmetrical.

The legs are made from 4×6 pressure treated (PT) lumber, with the height of 26-1/4″. The cross members connecting each leg are made from 2×4 PT and are joined together using dadoes cut.

Cut cross members to 31″ then apply adhesive and attach screws in points connecting the members.

Connect The Assemblies
After building the assemblies we are now to connect them together. Stake one of the four assemblies to the ground to prevent it from moving. Then measure the exact location where the next assembly should be attached. Stake the second assembly in the location determined earlier. You can then lay a 2×4 on top of the legs and fasten them using screw. After that side is done proceed to the other side. Attach a 2×4 on the assemblies’ cross member and screw into place.
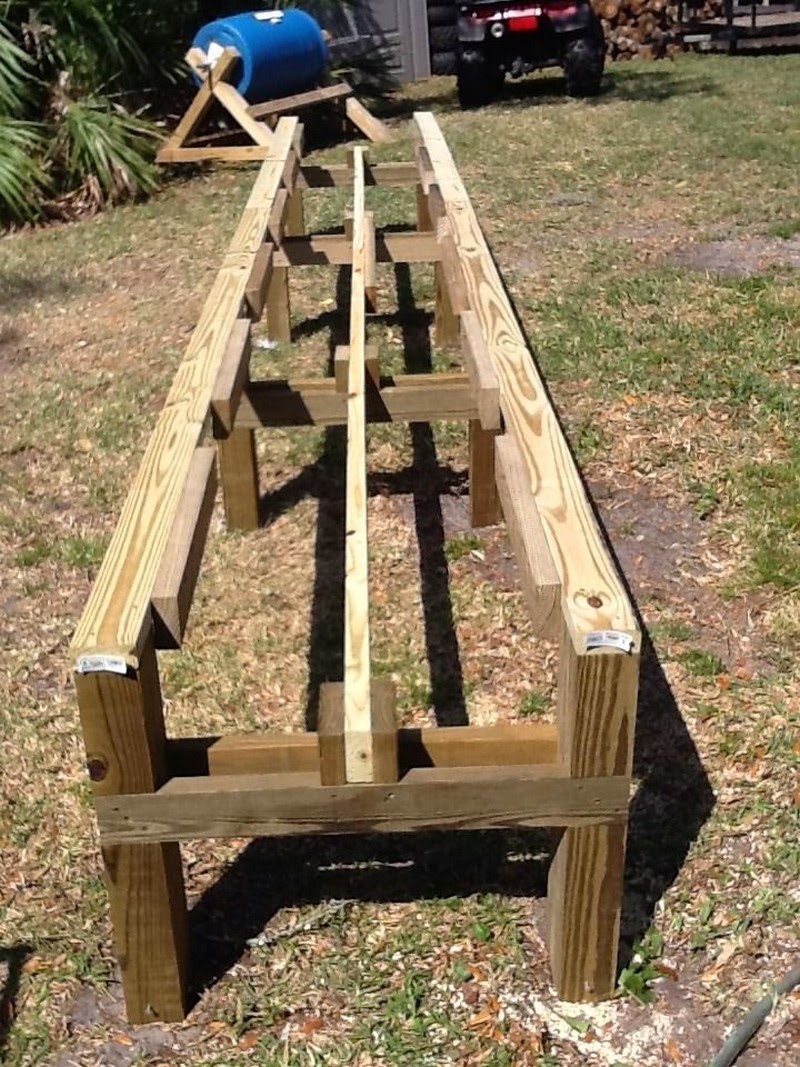
Attach Spacers
Using screws attach 2×4’s with the length of 2′ to the inner side of the 2×4’s connecting the legs of assemblies. These will serve as spacers giving the drums a snug fit and preventing them from rolling.

Cut And Install Drums
Carefully draw lines on the drums where the cut will be made. Cut the drum using a circular saw with carbide tipped blade. Once the drums are cut in half, wash them and let dry. Drill holes for drainage. Lastly install the drums and fill with soil. You can use the 2x4s that connects the legs of the assemblies to add a trellis.


Thanks to RushFan for the original idea!
Source : theownerbuildernetwork


No commentaires yet. Add your commentaires now!
Enregistrer un commentaire